Scripting is one of the most powerful aspects of IE editing. You can do countless things with it, and it can even be used to work around things which are otherwise hardcoded.
In this guide, I will cover everything from the basics of scripting to somewhat more advanced aspects and techniques. The later sections are geared primarily towards creature AI scripting; however, much of the information can be applied to all types.
Before I begin, there are three utilities which I would recommend you consider for scripting (instead of simply the game's compiler):
Infinity Script Editor
A nice little utility specifically designed for scripting (commonly called 'ISE'). Uses the game's script compiler and the script compiler IDS files, which can be an advantage or a disadvantage depending on your view. Unfortunately, it has some issues with decompiling and multiple actions with the same ID currently, which can cause problems with RES actions and such.
Near Infinity
A general IE file structure editing utility (commonly called 'NI'), but with a powerful script editor and compiler too. Does not use the game's script compiler, nor the script compiler IDS files. Requires the Java Runtime Environment.
WeiDU
Primarily a dialogue editor and mod distribution tool, but also functions as a command line script compiler. WeiDU offers some functions which the other tools do not allow, such as spaces in death variables, and more importantly, the ability to add strings to the TLK file within scripts, rather than using strrefs manually.
In addition, DLTCEP provides a GUI for the WeiDU script compiler.
You'll adapt to one of these utilities later, but take a look at both and see which you prefer.
IF
    Triggers(s)
THEN
    RESPONSE #100
        Action(s)
END
The logic behind this is: IF the triggers are true, THEN perform the actions.
All triggers which can be used in scripts are listed in TRIGGER.IDS. All actions can be found in ACTION.IDS.
For example:
IF
    See(NearestEnemyOf(Myself)) // If I see my nearest enemy
THEN
    RESPONSE #100
        Attack(NearestEnemyOf(Myself)) // Then attack my nearest enemy
END
There are, however, other aspects of scripts apart from actions and triggers. One other key part is objects, listed in OBJECT.IDS. They are used as part of both actions and triggers.
In the above script, both Myself and NearestEnemyOf() are objects. However, Myself is 'nested' inside NearestEnemyOf. Together, these form the more specific object: NearestEnemyOf(Myself), which, as above, can be used in both actions and triggers.
An ! before a trigger means 'not'. So !See([ANYONE]) would return true if nobody is seen.
There are two key types of triggers: those which respond to an event, and those which respond to a state of affairs. Those which respond to an event are only true for the AI cycle after the event has occured, and therefore sometimes must be used with care. Those which respond to a state of affairs are true as long as the state is in effect.
Other parts of scripts are listed in the other IDS files.
There are 3 types of file related to scripts:
BAF - this is an uncompiled script, in plain text format
BCS - this is a compiled script usable ingame for various purposes, and placed in the override folder or a BIF
BS - this is a compiled character script (the format is the same as a BCS file), which is placed in the scripts folder, and is selectable via the character record
To compile a BAF file, you can either use one of the utilities given about (Near Infinity has its own compiler), or use the game script compiler directly from the command line.
In the script compiler directory, there should be a number of IDS files (if you are using this compiler, remember to update these files as well as the game files with any necessary changes), a quick reference document, a compiler EXE and a compiler BAT file. This BAT file is what you will use to compile.
From the command line in the script compiler directory, type:
compile script.baf
Where script.baf is the name of the BAF file you wish to compile. The script will be compiled to a BS file in the compiled directory. Any errors will be listed in an ERR file in the errors directory.
Scripts are not stored in the cache, and as such, any script changes will take place immediately. You can even make changes to scripts while the game is running in some cases (generally not recommended), although the script may have to be re-assigned if it is running.
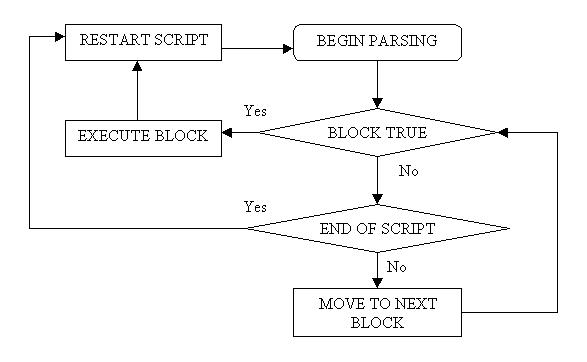
Continue() is an extremely useful action in that it allows greater control over the flow of the script, as it means the script is not forced to restart every time a block is executed.
A good example of the use of Continue() is in using the RandomWalk action in combat, an explanation of which can be found in the Useful Scripting Techniques section.
This diagram demonstrates how scripts are parsed in the game:
Again, however, as noted above, the Continue() action will cause the script to continue to the next block instead of restarting.
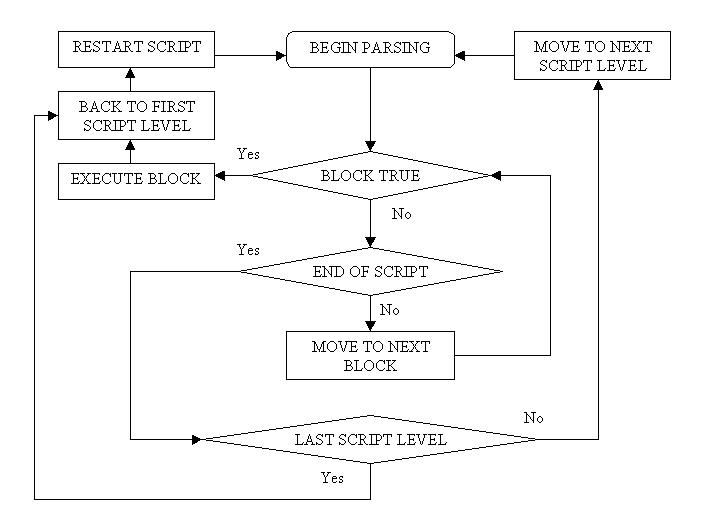
2) The way scripts interact at different levels:
There are 7 script levels which can be assigned to every creature: Override, Area, Specifics, Class, Race, General and Default. They are processed in that order; the first script is parsed, and if nothing in it executes, the game moves onto the next script, and so on. If anything is executed, a new cycle begins.
It is largely down to common sense and personal choice which slots are used for what. The default slot it used for generic scripts, for example WTASIGHT, while the override slot is used for the most specialised scripts, for example those specific to a single creature. The override script always takes priority over the other script levels.
With this new information, the diagram above can now be extended:
3) Multiple responses:
You are not limited to simply using a single RESPONSE #100 in scripts. You can have numerous responses. The actual response #s only matter relative to each other (they do not need to total 100), as they act as a weighting.
So, you could have, for example:
IF
    // Triggers
THEN
    RESPONSE #100
        // Action 1
    RESPONSE #100
        // Action 2
END
This will theoretically execute either action 1 or action 2 with equal chance of each when the block is executed. However, in practice, there is a bias towards the first response (see this post). Truly random responses, if essential, can be achieved using the RandomNum trigger.
4) Comments:
A very simple concept, but these help greatly in organising your uncompiled scripts, and, as they should be, are ignored by the compiler. They are denoted by two forward slashes, so:
// This is a comment.
Note, however, that comments cannot be used inside script blocks in IWD.
5) Use of OR blocks:
Normally, all the triggers in a block must be true for it to execute. However, OR can be used to prevent this.
In a script, OR will be always take the form OR(#), where # is a number greater than one. The # determines the number of alternative responses following. So, for example:
IF
    OR(3)
      Global("global1","GLOBAL",1)
      Global("global2","GLOBAL",1)
      Global("global3","GLOBAL",1)
    Global("global4","GLOBAL",1)
THEN
    RESPONSE #100
        // Actions
END
This will return true and be executed if either global, global2, or global3 is 1, AND global4 is 1.
It is worth noting that even if one item in an OR block is found true, the rest will still be checked. While normally irrelevant, this is useful for objects such as LastSeenBy(). Additionaly, the general rule of parsing of triggers applies: they are evaluated in the order they appear, so the last trigger in an OR block will always be checked last.
OR blocks cannot be used in BG1 or PST.
6) Nesting:
Objects can be 'nested' inside one another, as explained above. However, there is a limit to the level of nesting possible. You can have up to four objects nested inside each other.
So, this would be the maximum valid level of nesting:
NearestEnemyOf(LastAttackerOf(LastHeardBy(LastSeenBy(Myself))))
7) Variables:
Variables can be used to 'record' things in scripts. You can set their values, and later check them. One of the main purposes of this is to prevent something happenning more than once.
To set a variable, you would use the action SetGlobal(S:Name*,S:Area*,I:Value*). To later read it, you would generally use the trigger Global(S:Name*,S:Area*,I:Value*), to check the exact value of the variable. However, there are also triggers GlobalGT(S:Name*,S:Area*,I:Value*) and GlobalLT(S:Name*,S:Area*,I:Value*), which will check if the value of the variable is greater than or less than the specified value respectively.
There are 3 different types of variables that can be used: global variable, local variables and area variables.
Globals take the form Global("variable","GLOBAL",1), and are readable by anything. There can only be one value for a single global.
Locals take the form Global("variable","LOCALS",1), and are only readable by the creature they are set by (although they are settable with ActionOverride). Every creature can have a different value assigned to the same local.
Area variables take the form Global("variable","######",1), where ###### is the name of an area. They are assigned specifically to that area, and each area can have a different value assigned to the same variable.
So, for example:
IF
    Global("myvariable","GLOBAL",0)
THEN
    RESPONSE #100
        SetGlobal("myvariable","GLOBAL",1)
END
Will set the global 'myvariable' to 1 if is has a value of 0.
It is worth noting that because variables have to be added to the savegame, they take a short time to set. As such, it is best to avoid using too many of them in a section of a script which must be performed quickly. In addition, variables are only set at then end of a script 'cycle'. Therefore, you cannot set a variable and use it later on in the same cycle, as the script must be restarted.
Variable names are best kept short, as shorter names result in greater efficiency and quicker parsing of the script.
8) LastSeenBy():
The staple of any good targetting system. One of the features of the See trigger is that it stores the last object seen as LastSeenBy.
So, for example, you could use:
IF
    See([ANYONE])
THEN
    RESPONSE #100
        Attack(LastSeenBy(Myself))
END
Will attack anyone seen. The advantage of this, however, becomes more apparant with more advanced targetting systems.
Priority targetting takes advantage of the setting of LastSeenBy. For a detailed explanation of it, see the Useful Scripting Techniques section.
There are also other similar objects, such as LastHeardBy(), with their own specific triggers. These are discussed further in the OBJECT.IDS documentation.
9) Object Types:
These can be used to cut down the range of objects that return as valid from a trigger. They take the form [EA.GENERAL.RACE.CLASS.SPECIFIC.GENDER.ALIGN]. So, for example, instead of See([ANYONE]), you could use See([0.0.HUMAN.MAGE_ALL.0.0.MASK_GOOD]) to return any human good aligned mages.
10) Use of True() and False() triggers:
The True() trigger, when used alone, will always return true, and hence the block will always be executed if reached. The False() trigger will never return true when used in a block. It's primary use is in targetting, to ensure that LastSeenBy is stored correctly, but the script does not execute blocks unnecessarily or restart (see above).
11) Timers:
Global timers are used in scripting to cause something to occur after a certain time. While either real or ingame timers can be set, ingame are generally the more useful type. Timers are treated as variables which count down (indeed, you can set a timer value with SetGlobal as well as SetGlobalTimer, making it essential to use different names for variables and timers), and can be either GLOBAL or LOCALS.
For example, to set a global timer, you would use something like:
IF
    // Triggers
THEN
    RESPONSE #100
        SetGlobalTimer("timer1","GLOBAL",3600)
END
There are also a number of techniques possible to check for timers.
GlobalTimerExpired will return true if the timer has expired.
!GlobalTimerExpired will return true if the timer has not expired or has not been set
GlobalTimerNotExpired will return true if the timer has not expired
!GlobalTimerNotExpired will return true if the timer has not been set or has expired.
So having used the block above, you could then use:
IF
    GlobalTimerExpired("timer1","GLOBAL")
THEN
    RESPONSE #100
        // Actions
END
Which would perform the specified actions when timer1 has expired.
One very common use of timers in AI scripts is in cast 'n' attack routines, where the timer is used to keep track of the pause between spellcasting and allow the creature to attack intermittantly. For a more detailed explanation of this, refer to the Useful Scripting Techniques section.
However, for a quicker response that global timers, simple timers can also be used, via the StartTimer action, and the TimerExpired trigger. The lack of a TimerNotExpired trigger, however, means that they must be "initialized" with an OnCreation() block:
IF
	OnCreation() // Either when the creature is created or the savegame is loaded
THEN
	RESPONSE #100
		StartTimer(101,1) // Cast 'n' Attack
		StartTimer(102,1) // Attack
		StartTimer(103,1) // Movement
END
It is also worth bearing in mind two other things: firstly, regular timers are not stored in the save (making them unsuitable for things such as quests), hence the need of OnCreation(), and secondly, the ID of a timer cannot exceed 255. Therefore, TimerExpired(256) would always return true.
12) Shouts:
Shouts are almost a form of communication between scripts. Shouts are effectively numbers, but liked to an IDS file for better identification.
So, in one script, if you use:
IF
    // Triggers
THEN
    RESPONSE #100
        Shout(1001)
END
The shout 1001 will be used. With an IDS entry, this can of course be changed to something like MY_SHOUT.
In a completely separate script, a shout can then be picked up:
IF
    Heard([ANYONE],1001)
THEN
    RESPONSE #100
        // Actions
END
However, note that a shout can only be 'heard' within the same script cycle as it occurs; as such, the two scripts must also be running simultaneously.
This allows communication between different creatures. Shouts are intended to be realistic, and the range of a Shout() action is slightly greater than visual range. A GlobalShout() action, however, can be Heard() throughout the entire area.
The script:
Will display the string "test1 and test2".
Note that you cannot assign different value to the same token for different creatures. SetToken is a 'global' action.
However, tokens also have further use. You can use SetTokenGlobal to set the value of a token to that of a global, which can be useful in some situations.
You can also use tokens for targetting, with SetTokenObject.
Bear in mind that tokens are not stored in the savegame; therefore, for them to be used, they must be reinitialized every time the game is loaded.
Upon first inspection, the ACTION.IDS and TRIGGER.IDS files often appear somewhat incomprehensible. However, when used properly, they can tell you the syntax used with each action or trigger.
This is an example of an entry in TRIGGER.IDS.
Inside the brackets, the parameters for the trigger are given. These are separated by commas, and always take the form X:Something* or X:Something*Something.
In the first case, the X indicates the type of argument.
O - object
P - point
A - action
S - string
I - integer
In the above example, the something is a brief explanation of the purpose of this argument; this is meaningless to the compiler, but can give an indication of what the argument should be.
It is also worth noting that strings are always written in quotes.
Other IDS files simply provide identifiers for use in scripts.
IDS files can be changed, and the script compiler and game will respond to this; however, it is important to fully understand them before attempting any changes. ACTION.IDS and TRIGGER.IDS in particular require understanding, and the main use for changes to point an action or trigger to another custom IDS file.
Will allow identifier values from a RANGE.IDS file to be used with this trigger.
1) 'Header' - sets any initial variables once only, and handles the turning hostile of neutral creatures.
This is simply an outline, and can obviously be adapted to suit personal preference. However, the crucial thing to bear in mind is that the most important blocks should always be placed towards the top of the script; so long as this is done, the rest is optional.
It is often best to plan out what a script needs to do, and how this should be organised within it before starting. When you begin writing a script, stick rigidly to the structure and use comments to organise it; section headings, block headings, and contents are all useful.
A cutscene can be called either from another script, or from dialog. A block to call a cutscene might look like:
Then, cutscene.bcs might contain:
CutSceneID sets who performs the actions in the cutscene. Therefore, anything intended to affect characters other than the CutSceneID must be performed via ActionOverride.
Another action commonly used in cutscenes is MultiplayerSync(). This will wait for all participants in a game to reach the same point before the script continues.
There is an additional action, SetCutSceneLite(TRUE), which functions similarly to StartCutSceneMode(). However, crucially, it allows other scripts besides the cutscene script to remain running. This opens up a number of possibilities, allowing for conditions to be checked during cutscenes. SetCutSceneLite(FALSE) functions for this as EndCutSceneMode() would.
Method 1
Having ensured that your spells are in this format, you then need to determine the number of the spell. This is a four digit number.
You can then use this number in the scripting action (or trigger) for your spell.
For example, if we have a spell called SPWI999.SPL, and we want to use it with ApplySpell() on whoever is running the script, in a script, we could write:
Since 2999 in the number that would be associated with SPWI999.SPL.
Method 2
Using the standard spell scripting actions, such as ApplySpell(), you can add your spell to SPELL.IDS. To be able to add the spell to SPELL.IDS, it must be in the standard naming convention, as explained above.
If you look at SPELL.IDS, you will notice that the spells are listed with first a number, then a name. When you add your own spell, you can choose any name you like; this name will be what you use to refer to the spell in your scripts if you choose to use this method. The number, however, does matter, and cannot be chosen. It must be the number of your spell, according to the filename, as explained above.
For example, using the example of SPWI999.SPL, first we would add the following line to SPELL.IDS:
Then, in a script, we could write:
This performs exactly the same function as the action in Method 1, but can make spells easier to remember, since they are assigned a name of your choice, rather than a fixed number.
Method 3
To be usable in scripts, these must be present in ACTION.IDS. They will only be present if you have ToB installed. However, they also work with just SoA; simply copy and paste the above list into ACTION.IDS, and save it.
In addition to these actions, HaveSpellRES(S:Spell*) is also a valid trigger which can be used in the same way.
With the RES actions, the spell does not have to be added to SPELL.IDS; the filename of the spell can be used instead. Note, however, that with these actions, the order of spell and target is reversed from what it is normally in the spell actions.
Based on this, with the now infamous example spell, SPWI999, we would simply use the following action to do the same as the example in the method above:
The RES actions are a far more efficient way of using spells in scripts than to add each one to SPELL.IDS.
It is up to you which method you use, but I would strongly recommend the RES actions if you have BG2.
---
BG2 has, in addition to those mentionned above, several other spell prefixes:
SPWM### - Wild Mage
The last two are used by non-mage kits which are able to cast mage spells.
Spells named in this way cannot be added to SPELL.IDS, and hence cannot be used without the RES actions. There is no number for use in either the IDS of actions/triggers associated with either SPWM, SPDR or SPRA.
It is also worth noting that the RES actions are not case sensitive, so either SPDR### or spdr### is fine.
In the STATS.IDS, there are a number of SCRIPTINGSTATES. The value of these can be read, like anything else in STATS.IDS, with the CheckStat trigger. Detectable Spells work by assigning each spell a scripting state, and modifying the scripting state for the duration of the spell.
To begin making a spell detectable, it is necessary to add an extra effect to the spell. You need to use the 'Scripting State Modify' effect. The parameters of this effect are listed as unknown. The first unknown is the value to set the specified scripting state to. The second is the scripting state to modify; this starts (confusingly) with 0 corresponding to SCRIPTINGSTATE1, 1 to SCRIPTINGSTATE2, and so on.
Having done this, you can then use CheckStat(O:Object*,I:Value*,SCRIPTINGSTATE) to determine the value of a scripting state, and hence the spell that is in effect.
STATS.IDS can be extended, adding further scripting states, up to a limit of 31. This limit makes it necessary, if many spells need to be detectable, to assign multiple spells to one scripting state (hence each spell setting the scripting state to a different value). In choosing which spells go together, it is best to choose spells that will not be cast at the same time.
Based on this, you can make enemies react more effectively to any spells in effect on the party in your mod or TC.
Method 1: A Large OR() Block
While this block looks unusual, after it has been assessed, LastSeenBy() will be left as the highest priority target found, since the block is assessed line by line, and LastSeenBy() will be changed every time a valid target is encountered. The False() trigger ensures that the block is never actually executed, so that the script can continue to the attacking blocks when LastSeenBy() has been set appropriately.
A basic attacking block might look something like:
However, spellcasting can also be done using LastSeenBy(). Spellcasting blocks are always best placed above basic attacking blocks, simply because they are usually preferable to attacking. It is also often good to use a RandomNum trigger with spellcasting blocks to randomise the use of spells somewhat (although this can also apply to other attacks).
The main disadvantage of this method is that extra conditions for each target are not possible. In this method, extra checks on LastSeenBy() should not be added to the targetting block, as LastSeenBy() will be set regardless of whether they are true or not.
Method 2: Multiple Blocks
Again, the lowest priority target is at the top, while the highest is at the bottom. False() plays the same role as previously.
LastSeenBy() will only be assigned to the target if it is not STATE_STUNNED.
Attacking blocks can then be used in the same way as the previous method.
Method 3: 'False Conditions'
This time, the highest priority target is at the top. The logic of this block can be quite hard to follow at first, but basically, the block first checks for a sorceror. If one is seen, LastSeenBy is set due to the See() trigger (in spite of the !), and the block returns false, so it moves on to the next one. If no sorceror is seen, the trigger returns true, so the second one is evaluated, looking for a mage. In the same way, all of the triggers are evaluated until one is found false, indicating a valid target.
This can be extended slightly to allow OR blocks to be used to perform other checks on the validity of the target. An OR() block with all the possible triggers to make a target invalid in can be used, as follows:
This block is rather more complex. However, the basic principle is the same. When the block is parsed, the first OR block is assessed. If any of the conditions are true, making the target invalid, then this OR block returns true, and the next one is assessed. If none of the triggers in the OR block are true, then the target is valid, LastSeenBy() is set, and the next script block will be evaluated.
When using this method of targetting, it is important to consider not only the use of NearestEnemyOfType() targets, but also NearestEnemy() objects too. These must be treated slightly differently, since placing !See(NearestEnemyOf(Myself)) at the top of a block will cause it to be assessed only if no enemies are present (therefore, no other targets will be considered).
When this block is evaluated, it will return false immediately unless an enemy is seen (possibly meaning another cutoff is required). If an enemy is seen, however, LastSeenBy() is set, and unless one of the conditions in the first OR block is true (invalidating the target), the block returns false. All other conditions are assessed in the same way.
This means that there are two basic logics here for NearestEnemyOf and NearestEnemyOfType. These can of course be combined into a single block. For example:
So, you might have:
You would then have a block:
In this case, the RESPONSE #10 leads on to the randomwalking block occasionally, so the creature randomwalks instead of attacking.
So, you might have the following block:
If similar lines are added to each spellcasting block to check for expiration of the timer, and set it when the spell is cast, then no spellcasting will be attempted when it is not possible, and this will allow other attacking blocks to be executed, such as:
In addition to this, you can also account for aura cleansing (alacrity) in cast 'n' attack routines. This is done simply with an OR block, in which the timer and another condition is used. You can either CheckStat(Myself,1,AURACLEANSING), or implement aura cleansing as a detectable spell and check for it.
This block will use a minor healing potion when hit points have dropped below 75%.
This block will use a potion of invisibility when the party is in sight and the creature is not invisible. Notice the two statechecks, which account for both forms of invisibility.
Passing items between creatures is also possible.
Firstly, it is necessary to create a new creature. This can be of any type, but is generally best kept small. Since it only exists for a very short time, it is generally not necessary to take extensive precautions to protect it.
Next, write the required script. This should perform all of the desired actions, be it on the surrounding area, on the player to summon the creature, or something else. The final action should be DestroySelf().
Finally, you can use an effect to summon this invisible creature, and run the script.
1) How can I have an item level up with the wielder?
This will swap the item for the newer one when the specified level is reached.
The problem with this is that the DPLAYER scripts are deactivated with the party AI. Therefore, it is usually better to use BALDUR.BCS.
2) How can I use strings in scripts?
3) How can I cause random item placement via scripts?
Alternatively, to randomly spawn items on creatures, you could add something similar to a creature script, using a local variable.
4) Can a STATE be changed in a script?
5) Can I create a random maze or randomly link areas?
Yes. Firstly, you would use an initial script, which would run when the game was started.
You would then have a trigger region in an area, which would run a script similar to the following:
6) What are some common scripting pitfalls?
7) How can I link a script with an item?
The first method it to use the 'change AI script' effect on the user to have them run an appropriate script on themselves. You can then change the script back when required via the script itself. The problems with this are that having a character run the script on himself can potentially cause stuttering, and also that it can interfere with other modifications which assign scripts to characters.
The second way is to summon an invisible creature. For more information on this, see the Invisible Creature section. The only disadvantage of this is that creating large numbers of creatures can be problematic, so it may be inappropriate in some situations.
The final way is to use either DPLAYER2/3.BCS or BALDUR.BCS. The latter is usually preferable, since the DPLAYERs are deactivated with party AI; however, in some circumstances, it cannot be used. The appropriate blocks in the script can be activated from the item by setting a variable.
8) Why does the game crash when I cast some of the class spells like SET_SNARE_TRAP through scripting?
More will be added as they become apparant or are asked.
13) Tokens:
Tokens are interesting things. As well as the basic ingame tokens, you can also use custom tokens. They enable you to assign text from one string to another 'on the fly'.
For example, let's say:
string1 = "
string2 = "test1"
string3 = "test2"
IF
    // Triggers
THEN
    RESPONSE #100
        SetToken("TOKEN1",#####) // string2
        SetToken("TOKEN2",#####) // string3
        DisplayString(Myself,#####) // string1
END
In this example, the first action sets
One use of SetTokenGlobal might be for debugging: you can use it to check the value of globals with a hotkey via a script, which might be more convenient than the console. Simply create a string in the TLK with the token to be used, and have a hotkey triggered script assign the value of the variable you are checking to this token. Of course, you can use multiple tokens and variables.
If you use the action SetTokenObject("TARGET",Myself), you can then use [TARGET] as an object in subsequent blocks/scripts.
14) Default scripts
There are a several 'default' scripts which run all the time in the various games.
In all games, the DPLAYER scripts are present. Of these, the important ones are DPLAYER2.BCS, which is assigned to all party members on joining, and DPLAYER3.BCS, which runs on the protragonist. However, these scripts are deactivated when the party AI is turned off.
In the Baldur's Gate games, BALDUR.BCS (and BALDUR25.BCS in ToB) are also present. They have no specific object (and as such, local variables do not work in them), but run all the time.
Finally, PLAYER1D.BCS runs whenever the party rests, in a similar way to the NPC entries in PDIALOG.2DA.
Part IV: Understanding IDS Files
The IDS files are used both by the game's internal compiler (for DLG files) and by the normal script compiler. Their purpose is to link a numeric (either decimal or hexadecimal) value to a descriptive string.
0x400F Global(S:Name*,S:Area*,I:Value*)
The 0x400F part is the trigger ID, and is not important in writing scripts. However, it is worth understanding that when the script is compiled, this is the number to which the compiler converts the action or trigger you used.
This can be:
This can be:
In the form of [X.Y] where X and Y are numbers. A point of [-1,-1] used to mean the actual position of the actor
Used only with ActionOverride, this is an action to perform
This may be an area name (strictly 6 characters), death variable (theoretically up to 32 characters, but in practice, should not be over 18, to allow for 'sprite_is_dead'), a resref (filename, up to 8 characters long) or in IWD2 a spell string (which consists of a string of spell numbers, each made up from 3 letters).
Either a decimal, hexadecimal or IDS lookup value. TLK strrefs are integers.
In the second case, it is the same, but the something after the asterisk indicates that entries from an IDS file are used.
So, in the above example, the first parameter is the global name (a name), the second is the area (a name), and the third is a value (integer).
For exmaple, changing the range trigger to:
0x4018 Range(O:Object*,I:Range*Range)
Part V: Organising AI Scripts
There is no set way in which AI scripts should be organised. It is much a matter of personal style, and as such, this section is largely my personal style of structuring scripts. It works fairly effectively, but is obviously not the only method to use.
Here is the order I place my sections in AI scripts:
2) Weapon handling - sets globals to indicate later on what types of weapon are available: this only occurs once normally (although setting globals should allow for it to cope with running out of ammo); good weapon handling is crucial, and this is done early on
3) Priority actions - includes all manner of behavior which is important to perform; this includes hiding in shadows, moving to the player if they are unseen, running from area spells, and coping with low hit points
4) Item usage - items are placed in order, with the most preferable to use at the top
5) Target acquisition - selects the target as appropriate for later attacking blocks; the See or Detect triggers are not used beyond here, to avoid disrupting the targetting process
6) Movement - maneuvering as a result of the presence of a target or other enemy nearby, or in preparation for an attack
7) Further item usage - semi-random usage of offensive items such as wands on the selected target
8) Spellcasting - casts spells semi-randomly on the selected target, with appropriate checks performed
9) Physical attacks - attack the target physically, taking into account distance and the weapons available (which are stored in globals); also includes support for later randomwalking
10) Randomwalking - a last resort block, which helps in target selection and makes combat more interesting
For more information on what some of these sections I have listed actually consist of, see the Useful Scripting Techniques section.
Remember that a well structured script is more fluent, and will prevent slowdown due to size.
Part VI: Cutscenes
Cutscenes are a special type of script. They are run via StartCutScene("script"), and all blocks are parsed once (normal script parsing rules do not apply).
Ingame, cutscenes are usually seen when the interface disappears; characters perform pre-scripted actions without interference from the player.
IF
	// Triggers
THEN
	RESPONSE #100
		ClearAllActions() // This ensures that all action lists are cancelled before beginning the cutscene
		StartCutSceneMode() // This action removes the player interaction from the game
		StartCutScene("cutscene") // Starts the cutscene 'cutscene.bcs'
ENDIF
True() // Cutscene conditions are always read as true anyway
THEN
RESPONSE #100
CutSceneID(Player1) // This must be specified in every cutscene block, and specified who 'performs' the actions
// Actions
EndCutSceneMode() // This reverses the StartCutSceneMode() action
END
However, each ActionOverride must be completed before the next action is executed. Therefore, ActionOverride(Object,PlayDead(180)) would also cause a delay in the CutSceneID's actions. To solve this, multiple blocks, and hence multiple CutSceneIDs are possible. All blocks will be executed simultaneously, but the problem with actions delaying one another is removed.
Part VII: Useful Scripting Techniques
There are a number of common/useful techniques that can be used in scripts and are worth knowing. Here, I will explain a few of them.
1) Using Custom Spells in Scripts
Once you have created a spell, there are three alternative ways to go about using it in scripts.
This method should apply to all IE games.
To allow you to use spells with this method, they must be in the standard naming convention:
SPPR### for priest spells
SPWI### for wizard spells
SPIN### for innate spells
SPCL### for class spells
The first number should be the level of the spell. The other two can be anything, but be sure not to overwrite an existing spell.
The number is dependant on the filename of the spell.
- The first number denotes the type of spell: 1 for priest, 2 for wizard, 3 for innate, 4 for class
- The last 3 numbers correspond to the numeric suffix of the SPL file.
ApplySpell(Myself,2999)
This method should also apply to all IE games. It works the same as the above method, but can be easier to use, as it allows you to assign a name to your spell which can be referred to in scripts.
2999 Example_Custom_Spell
ApplySpell(Myself,Example_Custom_Spell)
The method definitely applies to BG2: SoA and ToB; it may work with other IE games, but has not been tested. It has, however, been confirmed that does not work with BG1.
In BG2:ToB, there are a number of RES actions that can be used in scripts:
31 SpellRES(S:RES*,O:Target*)
95 SpellPointRES(S:RES*,P:Target*)
113 ForceSpellRES(S:RES*,O:Target)
114 ForceSpellPointRES(S:RES*,P:Target)
160 ApplySpellRES(S:RES*,O:Target)
181 ReallyForceSpellRES(S:RES*,O:Target)
191 SpellNoDecRES(S:RES*,O:Target*)
192 SpellPointNoDecRES(S:RES*,P:Target*)
240 ReallyForceSpellDeadRES(S:RES*,O:Target)
318 ForceSpellRangeRES(S:RES*,O:Target)
319 ForceSpellPointRangeRES(S:RES*,P:Target)
337 ReallyForceSpellPointRES(S:RES*,P:Target*)
ApplySpellRES("SPWI999",Myself)
SPDR### - Druid
SPRA### - Ranger
The RES actions and triggers, however, can be used with these spells.
2) Detectable Spells
Firstly, an explanation. Normally, there is no way of detecting whether a creature is under the effect of some spells with a script (if there is not already a state or stat assigned to that spell).
However, the Detectable Spells system, developed by Kensai Ryu and Vulgar Zildrah, enables spells to be detected (hence the name) through scripts, using the CheckStat trigger and a Scripting State Modify effect.
The detectable spells pack can be found on Cirerrek's page. However, the system can also be put to use in mods and TCs, allowing for more effective AI for creatures, and that is the emphasis here.
The duration of the effect should be the same as that of the spell.
3) Priority Targetting
Priority targetting allows for better choice of targets in AI scripts, and can be applied to both melee attacks, ranged attacks, and spellcasting.
It is usually best to have the targetting section at the end of the script, as it is usually the lowest priority section present, and this makes it easier to avoid disrupting LastSeenBy().
There are three basic alternative ways of implementing priority targetting.
The first stage in any priority targetting system is to set the target as LastSeenBy() in one or more blocks.
As the name suggests, in this first method, the target is set in a single large OR() block. Something like:
IF
    OR(4)
      See(NearestEnemyOfType([GOODCUTOFF])) // Lowest priority (any enemy)
      See(NearestEnemyOfType([GOODCUTOFF.0.0.CLERIC_ALL]))
      See(NearestEnemyOfType([GOODCUTOFF.0.0.MAGE_ALL]))
      See(NearestEnemyOfType([GOODCUTOFF.0.0.SORCERER])) // Highest priority (sorcerer)
    False()
THEN
    RESPONSE #100
ENDIF
Range(LastSeenBy(Myself),10)
THEN
RESPONSE #100
EquipMostDamagingMelee()
Attack(LastSeenBy(Myself))
END
This second method, as above, relies on setting LastSeenBy(). However, it is done in multiple blocks, rather than a single OR block. This addresses the main shortcoming of this first block, as better control is available over the conditions for targetting.
The initial blocks, for setting LastSeenBy(), with this method, would appear similar to:
IF
    !StateCheck(ThirdNearestEnemyOf(Myself),STATE_STUNNED)
    See(ThirdNearestEnemyOf(Myself))
    False()
THEN
    RESPONSE #100
END

IF
    !StateCheck(FourthNearestEnemyOf(Myself),STATE_STUNNED)
    See(SecondNearestEnemyOf(Myself))
    False()
THEN
    RESPONSE #100
END

IF
    !StateCheck(NearestEnemyOf(Myself),STATE_STUNNED)
    See(NearestEnemyOf(Myself))
    False()
THEN
    RESPONSE #100
END

IF
    !StateCheck(SecondNearestEnemyOfType([GOODCUTOFF.0.0.CLERIC_ALL]),STATE_STUNNED)
    See(SecondNearestEnemyOfType([GOODCUTOFF.0.0.CLERIC_ALL]))
    False()
THEN
    RESPONSE #100
END

IF
    !StateCheck(NearestEnemyOfType([GOODCUTOFF.0.0.CLERIC_ALL]),STATE_STUNNED)
    See(NearestEnemyOfType([GOODCUTOFF.0.0.CLERIC_ALL]))
    False()
THEN
    RESPONSE #100
END

IF
    See(NearestEnemyOfType([GOODCUTOFF.0.0.MAGE_ALL]))
    False()
THEN
    RESPONSE #100
END

IF
    See(NearestEnemyOfType([GOODCUTOFF.0.0.SORCERER]))
    False()
THEN
    RESPONSE #100
END
However, conditions (which in this case vary for different target types) are present for targetting. So, for example, in:
IF
    !StateCheck(NearestEnemyOfType([GOODCUTOFF.0.0.CLERIC_ALL]),STATE_STUNNED)
    See(NearestEnemyOfType([GOODCUTOFF.0.0.CLERIC_ALL]))
    False()
THEN
    RESPONSE #100
END
In all blocks, the extra conditions should always be above the See() trigger. If they are not, LastSeenBy() will be set regardless, since the See() trigger has already returned true.
While the name I have invented for it gives away little about this targetting method, it is superior in terms of efficiency to the previous two mentionned. This method uses a single targetting block, and cuts off the remaining targets once a valid one has been found, hence the improved efficiency.
A basic block using this method might appear as follows:
IF
    !See([GOODCUTOFF.0.0.SORCERER]) // Highest priority
    !See([GOODCUTOFF.0.0.MAGE_ALL])
    !See([GOODCUTOFF.0.0.CLERIC_ALL])
    !See([GOODCUTOFF.0.0.DRUID_ALL])
    !See([GOODCUTOFF.0.0.BARD_ALL]) // Default target
    !See([GOODCUTOFF])
THEN
    RESPONSE #100
END
In this particular case, the block is also acting as a cutoff; the final condition evaluated is !See([GOODCUTOFF]). If this returns true (meaning no GOODCUTOFFs are in sight), the entire block returns true, and the lack of actions causes the script to restart. However, if this is not wanted, a False() condition can also be added at the bottom.
IF
    OR(3)
      StateCheck(NearestEnemyOfType([GOODCUTOFF.0.0.SORCERER]),STATE_HELPLESS)
      !See(NearestEnemyOfType([GOODCUTOFF.0.0.SORCERER]))
      RandomNumGT(20,5)
    OR(3)
      StateCheck(SecondNearestEnemyOfType([GOODCUTOFF.0.0.SORCERER]),STATE_HELPLESS)
      !See(SecondNearestEnemyOfType([GOODCUTOFF.0.0.SORCERER]))
      RandomNumGT(20,7)
    OR(3)
      StateCheck(NearestEnemyOfType([GOODCUTOFF.0.0.MAGE_ALL]),STATE_HELPLESS)
      !See(NearestEnemyOfType([GOODCUTOFF.0.0.MAGE_ALL]))
      RandomNumGT(20,9)
    OR(3)
      StateCheck(SecondNearestEnemyOfType([GOODCUTOFF.0.0.MAGE_ALL]),STATE_HELPLESS)
      !See(SecondNearestEnemyOfType([GOODCUTOFF.0.0.MAGE_ALL]))
      RandomNumGT(20,11)
    OR(3)
      StateCheck(NearestEnemyOfType([GOODCUTOFF.0.0.CLERIC_ALL]),STATE_HELPLESS)
      !See(NearestEnemyOfType([GOODCUTOFF.0.0.CLERIC_ALL]))
      RandomNumGT(20,13)
    OR(3)
      StateCheck(SecondNearestEnemyOfType([GOODCUTOFF.0.0.CLERIC_ALL]),STATE_HELPLESS)
      !See(SecondNearestEnemyOfType([GOODCUTOFF.0.0.CLERIC_ALL]))
      RandomNumGT(20,14)
    OR(3)
      StateCheck(NearestEnemyOfType([GOODCUTOFF.0.0.DRUID_ALL]),STATE_HELPLESS)
      !See(NearestEnemyOfType([GOODCUTOFF.0.0.DRUID_ALL]))
      RandomNumGT(20,15)
    OR(3)
      StateCheck(NearestEnemyOfType([GOODCUTOFF.0.0.BARD_ALL]),STATE_HELPLESS)
      !See(NearestEnemyOfType([GOODCUTOFF.0.0.BARD_ALL]))
      RandomNumGT(20,16)
    !See(NearestEnemyOf(Myself))
THEN
    RESPONSE #100
END
To avoid this problem, See() checks can be performed outside OR blocks. For example:
IF
    See(NearestEnemyOf(Myself))
    OR(2)
      StateCheck(NearestEnemyOf(Myself),STATE_HELPLESS)
      RandomNumGT(10,3)
    See(SecondNearestEnemyOf(Myself))
    OR(2)
      StateCheck(SecondNearestEnemyOf(Myself),STATE_HELPLESS)
      RandomNumGT(10,4)
    See(ThirdNearestEnemyOf(Myself))
    OR(2)
      StateCheck(ThirdNearestEnemyOf(Myself),STATE_HELPLESS)
      RandomNumGT(10,5)
    See(FourthNearestEnemyOf(Myself))
    OR(2)
      StateCheck(FourthNearestEnemyOf(Myself),STATE_HELPLESS)
      RandomNumGT(10,3)
    See(FifthNearestEnemyOf(Myself))
    OR(2)
      StateCheck(FifthNearestEnemyOf(Myself),STATE_HELPLESS)
      RandomNumGT(10,3)
    See(SixthNearestEnemyOf(Myself))
    OR(2)
      StateCheck(SixthNearestEnemyOf(Myself),STATE_HELPLESS)
      RandomNumGT(10,3)
    See(TenthNearestEnemyOf(Myself))
THEN
    RESPONSE #100
END
This type of block cannot be used with NearestEnemyOfType type objects, as See(NearestEnemyOfType([GOODCUTOFF.0.0.SORCERER])) will return true only if a sorcerer is seen, meaning that a sorcerer must be seen for the other targets to be evaluated at all.
IF
    OR(3)
      StateCheck(NearestEnemyOfType([GOODCUTOFF.0.0.SORCERER]),STATE_HELPLESS)
      !See(NearestEnemyOfType([GOODCUTOFF.0.0.SORCERER]))
      RandomNumGT(20,5)
    OR(3)
      StateCheck(SecondNearestEnemyOfType([GOODCUTOFF.0.0.SORCERER]),STATE_HELPLESS)
      !See(SecondNearestEnemyOfType([GOODCUTOFF.0.0.SORCERER]))
      RandomNumGT(20,7)
    OR(3)
      StateCheck(NearestEnemyOfType([GOODCUTOFF.0.0.MAGE_ALL]),STATE_HELPLESS)
      !See(NearestEnemyOfType([GOODCUTOFF.0.0.MAGE_ALL]))
      RandomNumGT(20,9)
    OR(3)
      StateCheck(SecondNearestEnemyOfType([GOODCUTOFF.0.0.MAGE_ALL]),STATE_HELPLESS)
      !See(SecondNearestEnemyOfType([GOODCUTOFF.0.0.MAGE_ALL]))
      RandomNumGT(20,11)
    OR(3)
      StateCheck(NearestEnemyOfType([GOODCUTOFF.0.0.CLERIC_ALL]),STATE_HELPLESS)
      !See(NearestEnemyOfType([GOODCUTOFF.0.0.CLERIC_ALL]))
      RandomNumGT(20,13)
    OR(3)
      StateCheck(SecondNearestEnemyOfType([GOODCUTOFF.0.0.CLERIC_ALL]),STATE_HELPLESS)
      !See(SecondNearestEnemyOfType([GOODCUTOFF.0.0.CLERIC_ALL]))
      RandomNumGT(20,14)
    OR(3)
      StateCheck(NearestEnemyOfType([GOODCUTOFF.0.0.DRUID_ALL]),STATE_HELPLESS)
      !See(NearestEnemyOfType([GOODCUTOFF.0.0.DRUID_ALL]))
      RandomNumGT(20,15)
    OR(3)
      StateCheck(NearestEnemyOfType([GOODCUTOFF.0.0.BARD_ALL]),STATE_HELPLESS)
      !See(NearestEnemyOfType([GOODCUTOFF.0.0.BARD_ALL]))
      RandomNumGT(20,16)
    See(NearestEnemyOf(Myself))
    OR(2)
      StateCheck(NearestEnemyOf(Myself),STATE_HELPLESS)
      RandomNumGT(10,3)
    See(SecondNearestEnemyOf(Myself))
    OR(2)
      StateCheck(SecondNearestEnemyOf(Myself),STATE_HELPLESS)
      RandomNumGT(10,4)
    See(ThirdNearestEnemyOf(Myself))
    OR(2)
      StateCheck(ThirdNearestEnemyOf(Myself),STATE_HELPLESS)
      RandomNumGT(10,5)
    See(FourthNearestEnemyOf(Myself))
    OR(2)
      StateCheck(FourthNearestEnemyOf(Myself),STATE_HELPLESS)
      RandomNumGT(10,3)
    See(FifthNearestEnemyOf(Myself))
    OR(2)
      StateCheck(FifthNearestEnemyOf(Myself),STATE_HELPLESS)
      RandomNumGT(10,3)
    See(SixthNearestEnemyOf(Myself))
    OR(2)
      StateCheck(SixthNearestEnemyOf(Myself),STATE_HELPLESS)
      RandomNumGT(10,3)
    See(TenthNearestEnemyOf(Myself))
THEN
    RESPONSE #100
END
4) Randomwalking
This is best used in combination with a priority targetting system, and can help in selection of new targets. It is often the very last block in a script.
You simply add an extra RESPONSE and a Continue() to your attacking block(s), which will lead onto the randomwalking block.
IF
	!Range(LastSeenBy(Myself),10)
	Global("d0hasranged","LOCALS",1)
THEN
	RESPONSE #100
		EquipRanged()
		Attack(LastSeenBy(Myself))
	RESPONSE #10
		Continue()
ENDIF
True()
THEN
RESPONSE #100
RandomWalkContinuous()
END
It is worth bearing in mind that randomwalking can be dangerous, as creatures can potentially become 'stuck' on such actions, preventing it running any scripts at all.
5) Cast 'n' Attack
This is a technique used to account for the pause between spellcasting. It cuts off spellcasting actions when they cannot be performed, allowing other attacks to occur instead.
The basic idea is to use a timer to keep track of the spellcasting pause. It is set whenever a spell is cast in the script, and no other spellcasting blocks are cast while it is active.
IF
    !GlobalTimerNotExpired("castnattack","LOCALS")
    HaveSpellRES("spwi999",Myself)
THEN
    RESPONSE #100
        SetGlobalTimer("castnattack","LOCALS",6) // Timer always set to 6, as that is the duration of the pause
        SpellRES("spwi999",LastSeenBy(Myself))
ENDIF
True() // Note that this requires this block to be placed below all others
THEN
RESPONSE #100
AttackOneRound(LastSeenBy(Myself))
END
So your triggers would be:
OR(2)
  CheckStat(Myself,1,AURACLEANSING)
  !GlobalTimerNotExpired("castnattack","LOCALS")
6) Item usage and handling
Item usage can be very long in scripts, as each item has to be handled individually. Items are used with the UseItem action. Cast 'n' attack should also be applied to item usage blocks, as using an item counts the same as casting a spell in this respect.
The triggers for an item usage block should always include a check for posession of the item, a check on a cast 'n' attack timer, and checks relevant to the actual item itself.
For example, a healing potion usage block might look like:
IF
    !GlobalTimerNotExpired("castnattack","LOCALS")
    HPPercentLT(Myself,75)
    HasItem("potn08",Myself) // Minor healing potion
THEN
    RESPONSE #100
        SetGlobalTimer("castnattack","LOCALS",6)
        UseItem("potn08",Myself)
END
Remember at this point that higher priority actions should come earlier in the script. Therefore, shouting for a cleric to cast a healing spell might be preferable to using a potion, in which case the block would appear earlier on.
IF
    !GlobalTimerNotExpired("castnattack","LOCALS")
    HasItem("potn10",Myself) // Potion of invisibility
    See([GOODCUTOFF])
    !StateCheck(Myself,STATE_INVISIBLE)
    !StateCheck(Myself,STATE_IMPROVEDINVISIBILITY)
THEN
    RESPONSE #100
        SetGlobalTimer("castnattack","LOCALS",6)
        UseItem("potn10",Myself)
END
Shouts are useful to achieve a realistic result here; however, specifics (or internals in IWD) can also be used if this is not wanted.
IF
    !HasItem("potn08",Myself)
    HPPercentLT(Myself,50)
    !GlobalTimerNotExpired("shouted","LOCALS") // Only shout so often
THEN
    RESPONSE #100
        SetGlobalTimer("shouted","LOCALS",10)
        Shout(NEED_POTION) // Shout for help
END

IF
    Heard([EVILCUTOFF],NEED_POTION) // If someone shouted for help
    !HasItem("potn08",LastHeardBy(Myself)) // Ensures they have not already been given an item
    HasItem("potn08",Myself)
    HPPercentGT(Myself,50)
THEN
    RESPONSE #100
        GiveItem("potn08",LastHeardBy(Myself)) // Pass them the item
END
7) The Invisible Creature Trick
The invisible creature trick is a method of running a script from a spell, item, or effect when required, as an alternative to changing a script level or interaction with the default scripts. This is useful to perform actions which can only be done in a script (and not with effects alone).
The basic principle is that a creature, with effects making it both invisible and invulnerable, is summonned when needed, which runs an AI script to perform the required actions. Very often, this involves the use of LastSummonnerOf(Myself).
To make the creature immortal and invisible, add the item 'minhp1' to it, and a permanent invisibility effect to the CRE file. Change the creature's script (override is usually best) to the script you need to run.
IF
	LevelGT(LastSummonerOf(Myself),10)
THEN
	RESPONSE #100
		ApplySpellRES("spell",LastSummonnerOf(Myself))
		DestroySelf()
END
Part VIII: FAQs
In this section, I will attempt to document some common scripting questions which I have seen asked. Hopefully, this will be of some use to people.
Firstly, you would need to create several items, one for each evolutionary stage.
Next, several blocks need to be added to DPLAYER2.BCS and DPLAYER3.BCS, one for each level-up of the weapon.
For example:
IF
	HasItem("weapon1",Myself)
	CheckStatGT(Myself,3,LEVEL)
THEN
	RESPONSE #100
		TakeItemReplace("weapon2","weapon1",Myself)
END
Note that TakeItemReplace does not exist in earlier games; therefore, two actions are needed: one to remove the old item, and one to create the new one.
Since this is a global script, each player must be accounted for individually in a separate block.
For example:
IF
	HasItem("weapon1",Player1)
	CheckStatGT(Player1,3,LEVEL)
THEN
	RESPONSE #100
		TakeItemReplace("weapon2","weapon1",Player1)
END

IF
	HasItem("weapon1",Player2)
	CheckStatGT(Player2,3,LEVEL)
THEN
	RESPONSE #100
		TakeItemReplace("weapon2","weapon1",Player2)
END

IF
	HasItem("weapon1",Player3)
	CheckStatGT(Player3,3,LEVEL)
THEN
	RESPONSE #100
		TakeItemReplace("weapon2","weapon1",Player3)
END

IF
	HasItem("weapon1",Player4)
	CheckStatGT(Player4,3,LEVEL)
THEN
	RESPONSE #100
		TakeItemReplace("weapon2","weapon1",Player4)
END

IF
	HasItem("weapon1",Player5)
	CheckStatGT(Player5,3,LEVEL)
THEN
	RESPONSE #100
		TakeItemReplace("weapon2","weapon1",Player5)
END

IF
	HasItem("weapon1",Player6)
	CheckStatGT(Player6,3,LEVEL)
THEN
	RESPONSE #100
		TakeItemReplace("weapon2","weapon1",Player6)
END
Strings are not actually stored in the BS or BCS files, but are instead found in the DIALOG.TLK file. Therefore, you will need to use a TLK editor to add or find the desired string, and note its 'strref' number, which is what you will refer to in scripts.
For placement in areas, you would need to modify the area scripts, and add a block to randomly spawn the items.
For example:
IF
    Global("addtreasure","AR9999",0)
THEN
    RESPONSE #100
        SetGlobal("addtreasure","AR9999",1)
        ActionOverride("container",CreateItem("item1",1,0,0))
    RESPONSE #100
        SetGlobal("addtreasure","AR9999",1)
        ActionOverride("container",CreateItem("item2",1,0,0))
    RESPONSE #100
        SetGlobal("addtreasure","AR9999",1)
        ActionOverride("container",CreateItem("item3",1,0,0))
END
No, you cannot change a state directly from a script. You must deal with the effect that is causing that state.
IF
	Global("link1","GLOBAL",0)
THEN
	RESPONSE #100
		SetGlobal("link1","GLOBAL",1)
	RESPONSE #100
		SetGlobal("link1","GLOBAL",2)
	RESPONSE #100
		SetGlobal("link1","GLOBAL",3)
ENDIF
Global("link1","GLOBAL",1)
THEN
RESPONSE #100
ActionOverride(Player1,LeaveAreaLUA("area1","",[100.100],1))
ActionOverride(Player2,LeaveAreaLUA("area1","",[100.100],1))
ActionOverride(Player3,LeaveAreaLUA("area1","",[100.100],1))
ActionOverride(Player4,LeaveAreaLUA("area1","",[100.100],1))
ActionOverride(Player5,LeaveAreaLUA("area1","",[100.100],1))
ActionOverride(Player6,LeaveAreaLUA("area1","",[100.100],1))
END
IF
Global("link1","GLOBAL",2)
THEN
RESPONSE #100
ActionOverride(Player1,LeaveAreaLUA("area2","",[100.100],1))
ActionOverride(Player2,LeaveAreaLUA("area2","",[100.100],1))
ActionOverride(Player3,LeaveAreaLUA("area2","",[100.100],1))
ActionOverride(Player4,LeaveAreaLUA("area2","",[100.100],1))
ActionOverride(Player5,LeaveAreaLUA("area2","",[100.100],1))
ActionOverride(Player6,LeaveAreaLUA("area2","",[100.100],1))
END
IF
Global("link1","GLOBAL",3)
THEN
RESPONSE #100
ActionOverride(Player1,LeaveAreaLUA("area3","",[100.100],1))
ActionOverride(Player2,LeaveAreaLUA("area3","",[100.100],1))
ActionOverride(Player3,LeaveAreaLUA("area3","",[100.100],1))
ActionOverride(Player4,LeaveAreaLUA("area3","",[100.100],1))
ActionOverride(Player5,LeaveAreaLUA("area3","",[100.100],1))
ActionOverride(Player6,LeaveAreaLUA("area3","",[100.100],1))
END
As suggested by a number of people in chat, here are some of the most common:
There are several ways you can run a script from an item or spell, and the most appropriate one will depend on what you want to do.
Class spells (SPCL###) should have their level set to 1. If it isn't and you check to see if you have the spell via the trigger HaveSpell() before casting it, the game will crash. There are ways to script around this problem, but the most effective solution is to edit the spell using Spell Maker in IEEP or Near Infinity to set the spell level to one and then place the fixed spell file in your override directory.
Fixed SPL files can also be found at Cirerrek's page.
Credits